
Quick Answer: AI Visual Inspection Data Labeling
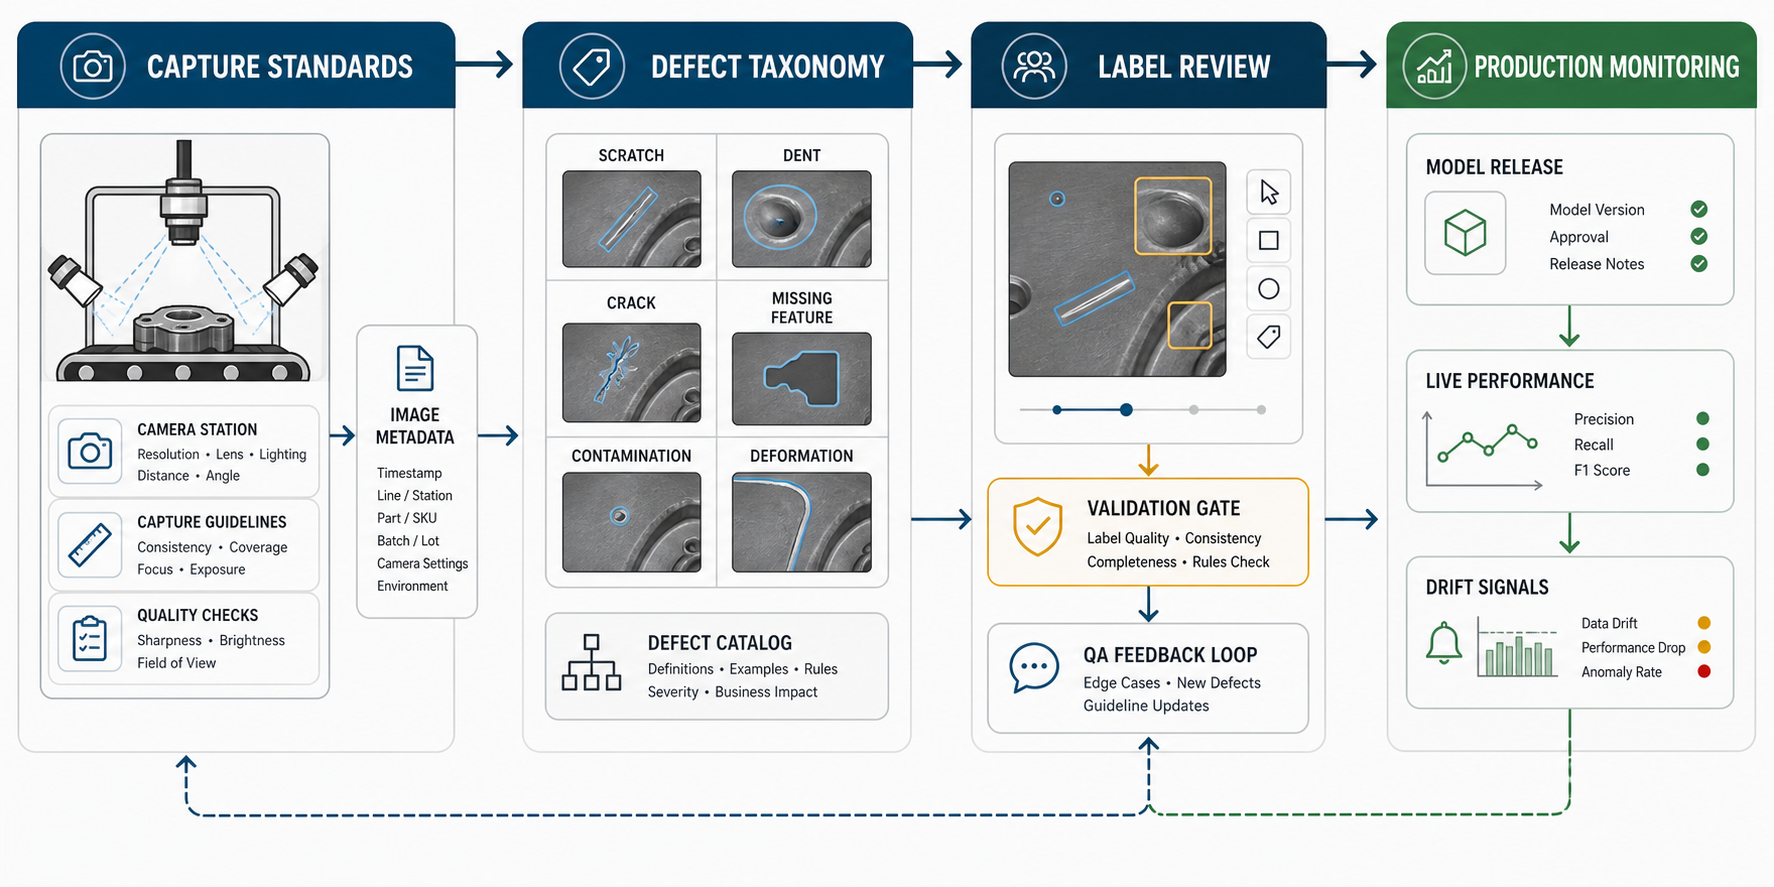
AI visual inspection data labeling is the operating system behind a reliable manufacturing defect model. It turns camera images into governed training, validation, holdout, and production-monitoring data by defining defect classes, severity rules, annotation boundaries, reviewer workflows, edge cases, and feedback loops from the shop floor.
The practical goal is not simply to label more images. The goal is to prove that the inspection team, labelers, QA reviewers, model team, and production operators all use the same definition of a defect. If labels are inconsistent, the model will learn the inconsistency and production will see false rejects, missed defects, manual overrides, and low trust.
For most plants, the right first milestone is a dataset readiness package: locked capture standards, approved taxonomy, reviewer agreement sample, separated train/validation/holdout sets, release thresholds by severity, and a plan for capturing production mistakes. Teams comparing inspection against other automation opportunities can use NextPage's AI in manufacturing use cases guide to see where computer vision fits in the broader roadmap.
What Data Labeling Must Prove Before Model Training
Manufacturing visual inspection is different from generic image classification. A scratch can be acceptable on one surface and critical on another. A dent may matter only when it crosses a tolerance threshold. Packaging, weld, seal, component, fill-level, contamination, and surface-finish issues often need different severity and disposition rules by product, station, customer requirement, or regulatory context.
Before model training starts, the labeling program should prove four things. First, the image capture process is stable enough that labels describe product quality rather than lighting or camera drift. Second, the defect taxonomy is specific enough that two trained reviewers can label the same image the same way. Third, the dataset split is clean enough to test the model without leakage. Fourth, the output can drive an actual QA workflow: pass, reject, rework, hold, route to reviewer, or escalate to engineering.
| Readiness Question | What Good Looks Like | Risk If Skipped |
|---|---|---|
| Are image conditions repeatable? | Camera, lighting, distance, lens, focus, trigger timing, and station metadata are documented. | The model learns lighting noise instead of defect evidence. |
| Are defect labels operational? | Classes, severity, acceptable variation, boundary rules, and disposition are approved by QA. | Labels do not match shop-floor decisions. |
| Are reviewers aligned? | Reviewer agreement is measured on a shared sample and disagreements feed taxonomy updates. | Different labelers teach the model conflicting rules. |
| Are splits protected? | Train, validation, and holdout sets are separated by time, batch, product, or station where needed. | Validation scores look strong but fail on live production. |
| Is launch evidence defined? | Precision, recall, false rejects, false escapes, latency, review burden, and override capture are tracked. | The pilot has no clear release gate or scale decision. |
When the inspection use case has higher safety, compliance, or warranty stakes, borrow stricter validation habits from NextPage's ADAS validation and automotive AI quality control roadmap: define the context of use, map edge cases, separate evidence sets, and preserve release traceability.
Set Image Capture Standards Before Labeling
Labeling cannot rescue unstable capture. Before thousands of images enter an annotation queue, document the camera, lens, resolution, exposure, lighting, distance, angle, background, part orientation, trigger timing, and file format for each inspection station. Capture rules should reflect the line, not only a clean lab bench.
Include normal production variation from shifts, operators, suppliers, materials, machine settings, surface finishes, and acceptable cosmetic differences. If a pilot is trained only on curated images, it can look good in a demo and unreliable next to a live conveyor, packaging cell, weld station, or assembly line.
- Lock the camera setup: define camera location, focus, exposure, lens, lighting, part orientation, trigger timing, and image rejection rules.
- Capture station metadata: keep line, station, camera, part number, batch, shift, timestamp, and operator context when available.
- Separate lab and production samples: use lab samples for exploration, but keep production images for validation and release evidence.
- Plan edge deployment early: latency, image transfer, reject handling, and operator review affect how the dataset should be shaped.
- Audit image quality before labeling: reject blurred, cropped, overexposed, underexposed, duplicate, or ambiguous images before labelers spend time on them.
Teams that want this translated into a production system can start from NextPage's computer vision quality inspection for manufacturing service page, which frames data capture, model training, deployment, workflow UX, and monitoring as one implementation plan.
Build A Defect Taxonomy QA Teams Can Actually Use
A defect taxonomy is the shared language for the model, labelers, QA reviewers, process engineers, and production operators. It should define each defect class, severity level, boundary rule, acceptable variation, ambiguous case, example gallery, escalation path, and version history. The goal is not an academic hierarchy. The goal is repeatable QA decisions.
Start with business consequences. Which defects create customer returns, warranty exposure, safety risk, regulatory evidence, scrap, rework, or downstream assembly problems? Then define visible evidence and thresholds. Include suspicious-looking good examples because those hard negatives reduce false rejects.
| Taxonomy Element | Practical Rule | Example |
|---|---|---|
| Class definition | What visible condition counts as the defect? | Scratch: linear surface mark above approved length/depth threshold. |
| Severity | When is it critical, major, minor, or monitor-only? | Critical when it affects a sealing surface or safety function. |
| Region rule | Should labelers classify, box, segment, or mark a component zone? | Bounding box for localized defects; pass/fail for missing component. |
| Ambiguous bucket | What happens when the image is unclear? | Flag for QA review with reason code, note, and proposed label. |
| Versioning | How are taxonomy changes applied to old labels? | Taxonomy v1.2 with affected classes and relabeling notes. |
Regulated teams should be even more explicit. A packaging line, medical device line, or pharmaceutical label-inspection workflow needs traceable evidence for rejected and accepted parts. NextPage's pharmaceutical packaging visual inspection software page shows the same taxonomy and evidence discipline in a regulated QA context.
Create The Labeling Workflow And Review Governance
The labeling workflow should include labeler instructions, example galleries, review queues, disagreement handling, QA signoff, and a way to update definitions when production feedback reveals a gap. If annotation is outsourced, the manufacturing QA owner still needs to approve examples and adjudicate disagreements. External labelers can draw boxes; they cannot invent your defect policy.
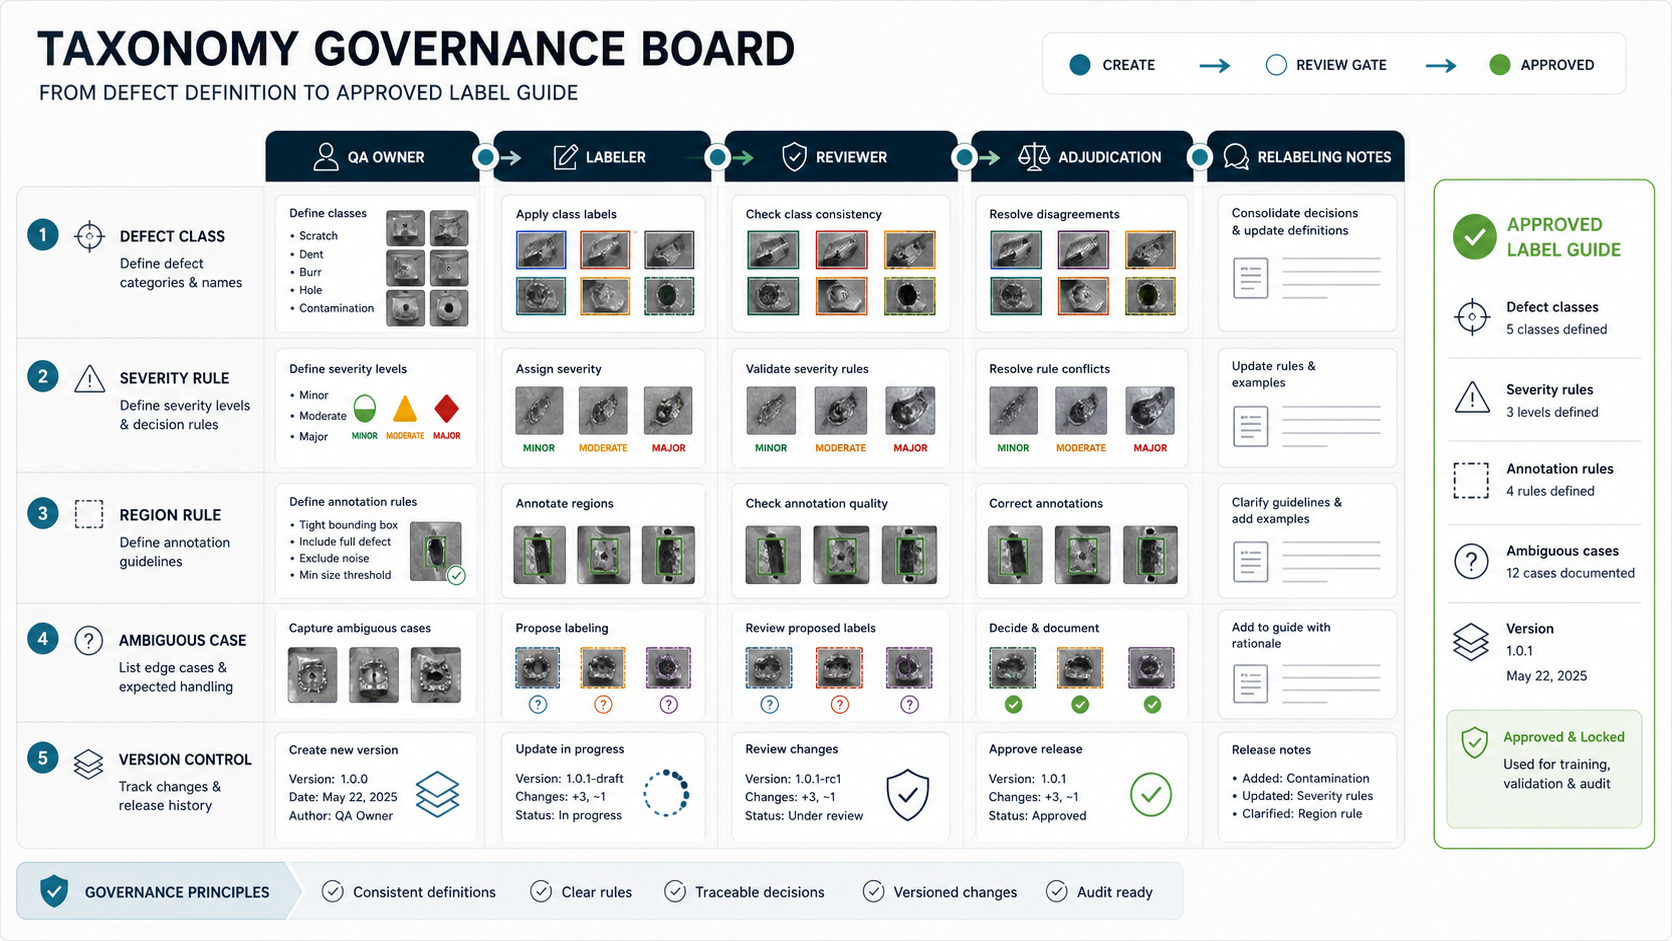
Use a two-pass workflow for important defect classes. First, labelers apply the taxonomy. Second, QA reviewers sample or approve labels, measure agreement, and send ambiguous cases back with notes. Track disagreement by defect class, part number, camera angle, and reviewer so the team knows whether the issue is labeler training, image quality, or the taxonomy itself.
- Gold examples: maintain approved examples and hard negatives for every class and severity tier.
- Reviewer agreement: measure agreement on a shared sample before scaling annotation volume.
- Dispute workflow: route ambiguous images to a named QA owner instead of forcing arbitrary labels.
- Relabeling policy: define when taxonomy changes require old labels to be updated.
- Audit trail: keep who labeled, who reviewed, what changed, and why the label guide was updated.
As visual review matures, QA teams often want inspection summaries, SOP retrieval, escalation routing, or operator-assist workflows around the model. NextPage's AI agents for manufacturing workflows service page covers how those supervised decision workflows can sit around inspection evidence without removing human accountability.
Balance Normal Parts, Rare Defects, Edge Cases, And Holdout Sets
Manufacturing defects are usually imbalanced. Most products are acceptable, while critical defects are rare. A dataset drawn only from normal production may underrepresent the defects the model must catch. A dataset made mostly from obvious defect samples may create a system that rejects acceptable variation. The data plan needs both production distribution and deliberate edge-case coverage.
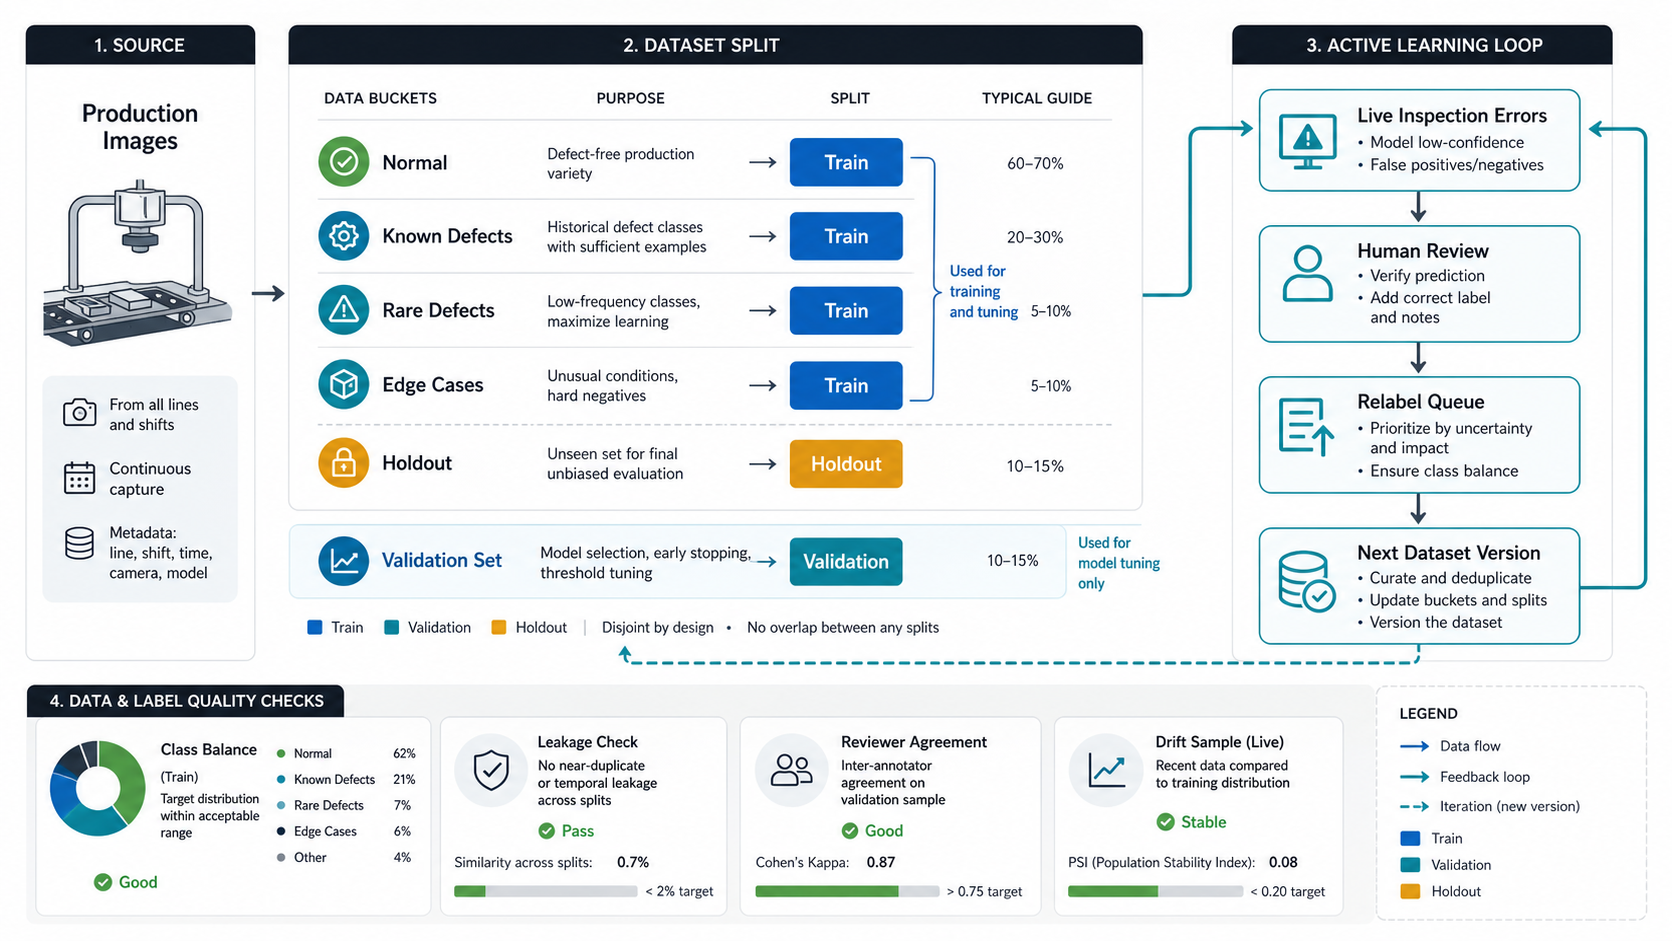
Split data before tuning the model. Keep the holdout set representative, protected, and untouched so it can answer whether the inspection system improved or simply overfit the validation set. When new products, cameras, suppliers, materials, lighting changes, or line conditions appear, create a controlled evaluation batch before trusting the model on the live line.
| Dataset Segment | Purpose | Common Mistake |
|---|---|---|
| Normal examples | Teach acceptable production variation. | Too few good examples from real lines and shifts. |
| Known defects | Teach class and severity boundaries. | Only obvious defects, no borderline cases. |
| Rare defects | Protect high-risk low-frequency classes. | Missing from validation until after a customer issue. |
| Edge cases | Stress lighting, angle, occlusion, material, and hard negatives. | Mixed into training without being tracked separately. |
| Holdout set | Final confidence check before release. | Leaked into prompt tuning, threshold tuning, or model selection. |
Use ROI logic to decide how much labeling effort is justified. The AI automation ROI calculator can estimate savings from inspection minutes, scrap reduction, rework avoidance, warranty-risk reduction, and faster QA decisions before the team scales annotation.
Connect Labels To Precision, Recall, False Alarms, And Review Burden
Inspection teams should connect labels to operational metrics, not just model accuracy. Precision tells you how many flagged defects are truly defective. Recall tells you how many real defects the system catches. False positives create unnecessary rejects and manual review. False negatives create quality escapes. Review burden tells you whether the workflow is usable on the line.
Thresholds should be set by defect severity and workflow impact. A cosmetic defect may tolerate more false positives during early rollout if human review is easy. A safety, sealing, electrical, dosage, label, or compliance-related defect may prioritize recall even if more parts are routed to review.
- Track per-class metrics: do not hide weak crack, chip, seal, or contamination detection behind aggregate accuracy.
- Inspect confusion pairs: find where the model mixes scratch, dent, burr, chip, hole, contamination, or missing component.
- Use confidence bands: route low-confidence images to human review rather than forcing automatic pass/fail.
- Measure review capacity: a model that flags too many good parts may fail operationally even with strong recall.
- Compare by station: review performance across cameras, shifts, product variants, suppliers, and lines.
For broader QA automation planning, NextPage's AI-powered QA automation roadmap helps teams connect risk, acceptance criteria, review loops, test evidence, and release controls.
Use Production Feedback To Improve Labels After Launch
Visual inspection data labeling does not end at launch. Production monitoring should capture false rejects, missed defects, operator overrides, reviewer corrections, new defect patterns, camera-condition changes, and workflow exceptions. Each issue should be traced back to the taxonomy, image capture process, label quality, threshold, model version, or workflow rule.
This is where visual inspection becomes an MLOps and product operations problem. The team needs versioned datasets, model releases, evaluation sets, monitoring dashboards, alert rules, rollback paths, and a recurring quality review. NextPage's MLOps implementation checklist covers these controls in more detail.
| Production Signal | What To Investigate | Dataset Action |
|---|---|---|
| False rejects spike | Lighting, camera drift, acceptable variation, threshold. | Add good examples and refine severity rules. |
| Missed defect | Rare class, poor image, missing taxonomy branch, weak annotation. | Add reviewed examples and update validation or holdout coverage. |
| Reviewer disagreement | Unclear definition or borderline tolerance. | Update label guide and relabel affected samples. |
| New product variant | Geometry, material, finish, supplier, or line condition. | Create a variant-specific evaluation batch. |
| Slow reject decision | Edge device, model size, network path, application workflow. | Adjust deployment and queue design before scaling. |
If inspection outputs need to trigger work orders, quality holds, dashboards, alerts, ERP updates, or MES disposition changes, treat the project as AI workflow automation. The workflow around the model determines whether inspection evidence becomes usable action.
Production Acceptance Gates For An Inspection Dataset
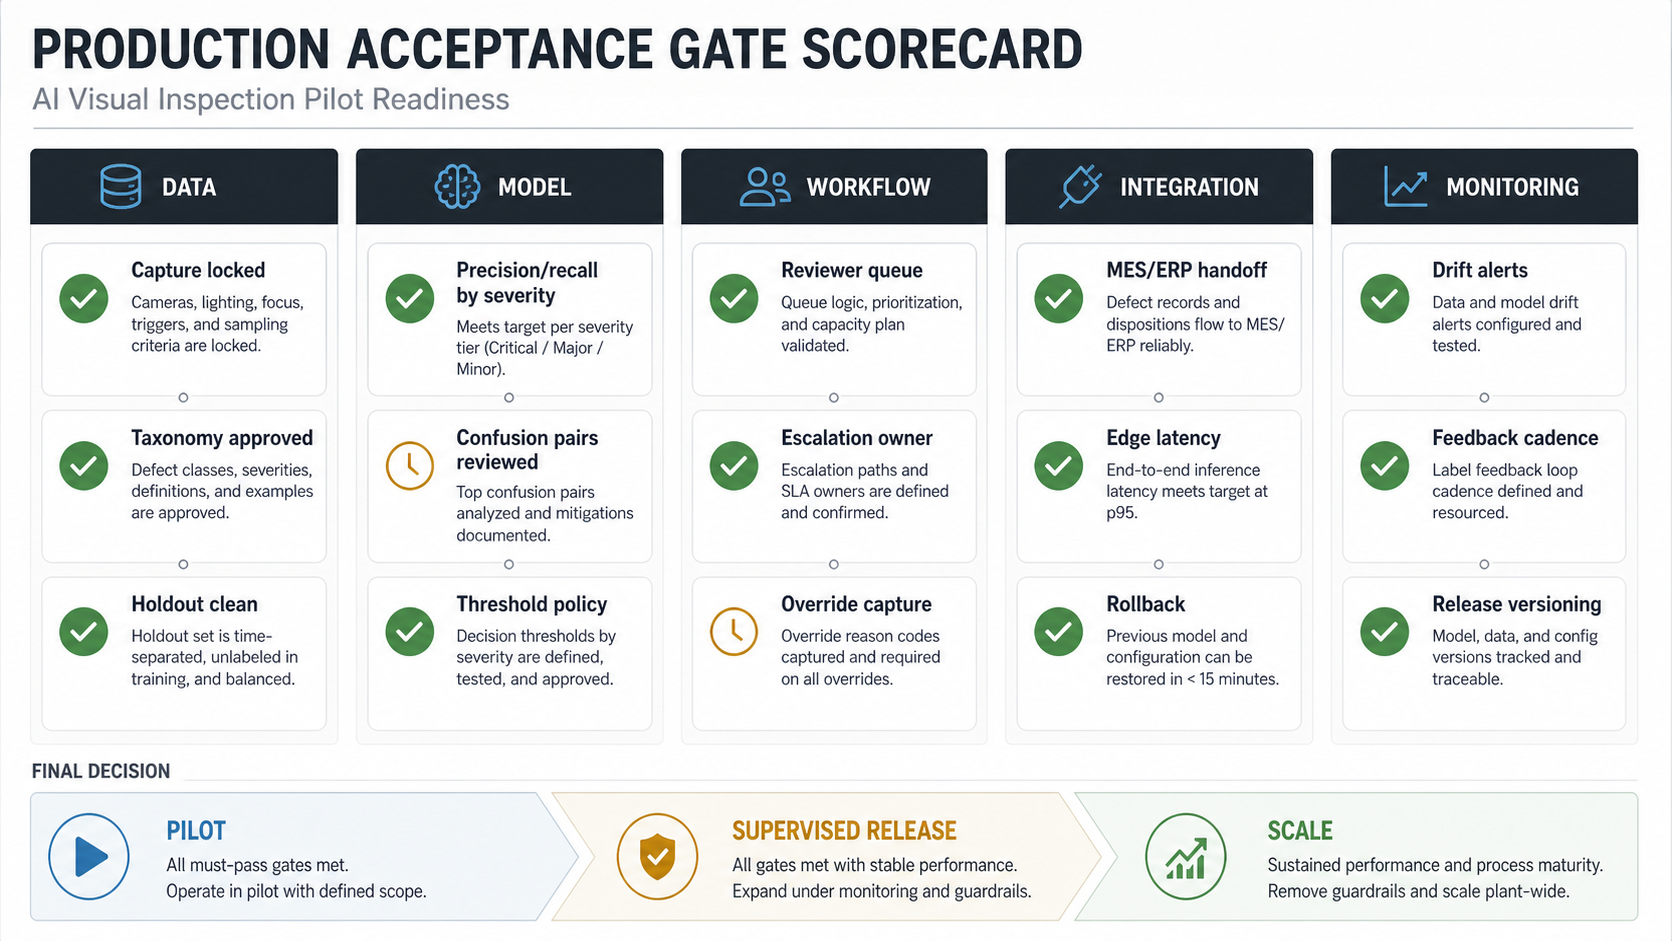
A production visual inspection pilot should have explicit gates. Without them, teams argue from demos, screenshots, or aggregate accuracy. With gates, QA and engineering can decide whether the system is ready for a scoped pilot, a supervised release, or plant-wide scale.
| Gate | Must Be True Before Release | Owner |
|---|---|---|
| Data | Capture rules locked, taxonomy approved, holdout protected, station metadata available. | QA owner and data lead |
| Model | Precision and recall reviewed by class and severity; confusion pairs documented; thresholds approved. | ML lead and QA owner |
| Workflow | Reviewer queue, escalation rules, override capture, and human review capacity are tested. | Operations owner |
| Integration | MES/ERP or dashboard handoff is reliable; latency meets line needs; rollback is available. | Engineering owner |
| Monitoring | Drift alerts, release versioning, feedback cadence, and recurring review are in place. | MLOps owner |
Inspection-heavy software usually fails when images, files, states, reviewers, and permissions are treated as side modules. NextPage's ClearRoute portfolio case study is a public-safe example of turning field inspection video into structured evidence, review workflows, and operational dashboards.
Build Vs Buy: What The Dataset Still Needs Either Way
Buying a visual inspection platform does not remove the need for data labeling discipline. Vendor tools can help with annotation UX, model training, active learning, and deployment, but the plant still owns defect definitions, pass/reject policy, sample representativeness, and production acceptance. Building a custom system gives more control over workflow and integration, but also requires stronger ownership of data operations and release governance.
| Decision Area | Vendor Platform Helps With | Your Team Still Owns |
|---|---|---|
| Annotation tools | Label UI, review queues, model-assisted labeling. | Taxonomy, examples, severity rules, and ambiguous case policy. |
| Model training | Baseline models, training pipeline, model comparison. | Representative data, holdout design, release thresholds. |
| Deployment | Edge/cloud runtime, monitoring hooks, dashboards. | Line integration, operator workflow, reject handling, rollback. |
| Governance | Versioning features and audit logs. | QA signoff, reviewer capacity, cadence, compliance evidence. |
| Expansion | Reusable project templates. | Product variant coverage, new defect classes, station-by-station validation. |
If the dataset, workflow, or integration requirements are highly specific, a custom layer may be needed around the model. NextPage's custom software development work is often the layer that connects inspection evidence to review queues, dashboards, permissions, files, ERP/MES events, and reporting.
How NextPage Helps Manufacturing Teams Launch Visual Inspection
NextPage helps manufacturing teams move from visual inspection idea to production-ready dataset and workflow. A practical first engagement audits the current inspection process, image capture setup, defect taxonomy, sample availability, labeling workflow, integration constraints, launch risk, and ROI case before model training begins.
From there, the work can move into image-data preparation, taxonomy design, annotation-review governance, model evaluation, reviewer UI, edge or cloud deployment planning, MLOps monitoring, and integration with manufacturing systems. The goal is not just a defect detector. The goal is a trusted QA workflow that reduces inspection bottlenecks, catches important defects, and keeps improving from production evidence.
If your team is preparing a visual inspection pilot, start with a dataset readiness review. NextPage can help define capture standards, labels, validation gates, release thresholds, feedback loops, and production integration before you invest in a full build.